So many entrepreneurs are intimidated by the website launch — what if something isn’t working? What if I forgot something? What if…. I spelled something wrong? The good thing is – you can always update your website. However, if you plan to launch without issue, you’ll want to comb through this must-have checklist for a website launch!
Design elements to double check
Design is often the most glaring aspect of a website, or the most immersive if done well! Double check some of these common design errors and you should be set!
Consistent font styles & sizes
You should have a strict set of fonts, sizes and colors that you use throughout your website. I recommend sticking to a distinct font for the headers, subtitles, paragraph text and calls to action. That’s already four fonts! Be consistent in how you use them to prevent your website from feeling all over the place.
Legible text
The last thing you want is text that is hard to read. This includes text overlaid on images, text that is too small or anything of that nature! Make sure that every piece of text passes the grandma test — even someone in their later years can read it with no issue!
High quality images that don’t slow down your site’s speed
Your images should be clear with no blurriness in sight. Blurry images just make websites feel unprofessional. Look up your website platform’s recommended image sizes! You want high resolution, but not so high that it slows down your load speed!
Consistent branding throughout
Of course, your branding should be consistent throughout your entire site. Use the same logo and other brand elements to create a cohesive appearance.

Functionality follow-through
Design is one thing — but is your website actually working?
Click every single thing on your website
It’s better for you to find a broken link than for one of your potential clients to do so! Go through the painstaking work of clicking every single thing possible on your website. Start on the home page and work your way through. It’s worth the peace of mind!
View your site on desktop, mobile and iPad
Websites are often viewed primarily through phones! This means that your entire site should be functional on a mobile device. Browse your website on desktop, mobile and iPad to prevent oversights.
Test the contact page
If you plan on receiving leads through a contact page (most of us do!), then be sure to test out the contact page yourself. Fill out the form and test any following workflows to make sure that you don’t lose leads in this transition from your website to your inbox. (Check out this post for more contact page tips!)
Check the preview link on social media
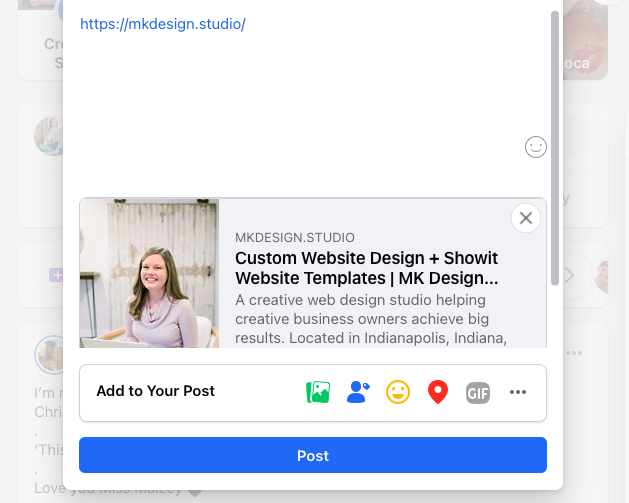
If you’ve shared a website on social media before, you’ve probably noticed that it auto-populates with an image and description. This is determined through settings on your website! To double check this, just add the link to your home page in a draft on Facebook. Put a space bar after the link and wait a few seconds for the preview to appear. If it looks good, then you’re all set! If you don’t like what shows up, update your home page settings (and any other main pages) to make sure your website will appear correctly when shared online!

Proofreading tips
Read it out loud
Worried about your content tripping up users? Read it out loud to catch overlooked mistakes and spelling errors.
Ask someone else to look at your website
Ask someone else to look at your website and pretend to be your ideal client. See if they can find the information they’re looking for. If you’re a photographer, don’t just have another photographer look at it. Ask someone in both your industry and another industry to comb through it as if they were interested in working with you. Ask for honesty — even feedback on the images used and placement of buttons is helpful!

SEO final checks
Organize text tags
Search engines use text tags to understand website layouts. Make sure your text tags are organized correctly.
H1 – only one per page
H2 – for subheadings
H3 – for subsections under specific subheadings
p – for paragraph text
nav – for navigation text or buttons
Set up page titles and meta descriptions
Your page titles and meta descriptions determine how your website appears on search engines! This also correlates to the social media preview I was talking about earlier. Plug in the information with unique titles and descriptions for every page.
Page title – include an SEO keyword and your business name or location
Meta description – describe what’s on the page and include an SEO keyword too
Optimize images
This could be an entirely separate blog post on its own, but we need to mention it here! The images on your website can be optimized for search engines. The alt text should describe what’s in the image for those that can’t see it, or if it doesn’t load. If it makes sense, you can include an SEO keyword in the alt text too! (Here’s a blog post to learn more!)
Run your website through a site speed tester
Let’s say a potential client opens up your website, interested to learn more. However, your website takes so long to load that they change their mind. This is why site speed is important! Plus, your search engine rankings will tank if your site speed is that bad! Google won’t send users to pages that just take too long to load. There are so many tools you can use for this! Just test the speed and make sure that no weird errors come up. Common errors include images that are too large, too much embedded content and too many widgets.
Index your site with Google Search Console
Search engines take some time to add new websites to their results. To s
peed this up, create a Google Search Console account for free and request site indexing!
Legal Elements
Copyright
Add a copyright in the footer with the current year and your business name!
Link to your privacy policy
Certain countries and business types require legal elements on your website such as a privacy policy, terms and conditions, and more. Be sure that you have the correct elements!

Showit Tips
Showit is a distinct web design platform that I use for all of my custom web design projects. Here are a few of the common errors I see!
Fix alignment
Have you ever visited a website where things just feel off, but you can’t quite put your finger on it! It probably had something to do with alignment. Perhaps boxes were sized wrong and elements just weren’t lining up. Make sure things are aligned with the alignment tool!
Hover actions
Check hover actions. It’s common to have hover actions by mistake.
Update the mobile side
People forget about the mobile side of things a lot. Open the mobile view and double check the menu and design!
Change the blog name
Your Showit blog page title can only be updated in WordPress. This leads to a lot of websites that launch with the template page title, “Showit Blog.” A lot of entrepreneurs have done this just to find out that when they add their blog to Facebook, it says “Showit Blog” and not “MK Design Blog.” To fix this, log in to your WordPress account and open the pages tab. From there, you can edit the page titles and meta descriptions, as well as featured images! Delete the sample page too!

Select a share image for every page
Under SEO settings in Showit, you can add a share image for each page. This is an image that will appear when you post the link on social media. Add a different image for every page to make them unique!
Thoughts or questions? Let me know! I can’t wait for you to launch your new website with this checklist. Learn more about my website template shop and web design services here.
